


Technically it should as I saw it work once in the Chesnaught raids, but good luck landing it past the early shield.Out of curiosity does Taunt work on the "preset" moves like the 60% Magic Room

-
Welcome to Smogon! Take a moment to read the Introduction to Smogon for a run-down on everything Smogon, and make sure you take some time to read the global rules.
-
Congrats to the winners of the 2023 Smog Awards!
July 7* Fairy Delphox raid event
- Thread starter doipy hooves
- Start date


Honestly with a moveset like that, a Delphox of your own probably doesn't do too bad either: you got the 100% accurate Mystical Fire to weaken it like Armarouge but you need less EVs to outspeed + more special bulk, Light Screen, and resist all its moves! So this way if you got Heatran spam, a "oh it disabled abilities!" wont blast them, since Magic Room means not even Ability Shield is gonna stop a strong Fire Blast from roasting them!
All this being said, I was saying "is it time for me to use tera shards on an Arceus", and... probably not. Sorta surprised they went with a moveset this wallable + debuffable. I think for now I'll either use my own Delphox (with blaze of course!), or if people are doofuses and can't help but make REALLY bad picks... I guess SpD Mew with Acid Spray / Snarl / Light Screen / Life Dew?
EDIT: Granted as I say all of this, Armarouge does have Acid Spray which is huge lol, sorry Delphox...


I'm undercover as another Flash Fire Steel-type
Mystic Fire + Acid Spray + AV Armarogue is doing work so far with randos. I feel like I can't die ever.
So I take it this would be the ideal moveset for Armarouge?
Mystical Fire
Flash Cannon
Acid Spray
Light Screen/Calm Mind
Mystical Fire
Flash Cannon
Acid Spray
Light Screen/Calm Mind
That mostly sounds fine, but I think if you get a Flash Fire boost, Flamethrower does more damage than Flash Cannon. At least if I was using AV I'd probably put Flamethrower as the last slot once you fully debuff it. I guess you could use Armor Cannon as well as a filler finishing move.So I take it this would be the ideal moveset for Armarouge?
Mystical Fire
Flash Cannon
Acid Spray
Light Screen/Calm Mind

Tera Steel Flash Cannon is safer since you still resist Psychic after you Tera.That mostly sounds fine, but I think if you get a Flash Fire boost, Flamethrower does more damage than Flash Cannon. At least if I was using AV I'd probably put Flamethrower as the last slot once you fully debuff it. I guess you could use Armor Cannon as well as a filler finishing move.
Second try with Armorouge after failing due to some idiot bringing an Iron Moth... and, granted, holding Light Clay over Shell Bell when I had no other recovery.
Armorouge @ Shell Bell
Modest Nature
Trait: Flash Fire
Tera Type: Steel
EVs: 252 SpAtk/SpDef
~ Clear Smog
~ Light Screen
~ Flamethrower
~ Flash Cannon
Armorouge @ Shell Bell
Modest Nature
Trait: Flash Fire
Tera Type: Steel
EVs: 252 SpAtk/SpDef
~ Clear Smog
~ Light Screen
~ Flamethrower
~ Flash Cannon
As for the Violet players, how do you guys thing Ceruledge will fair in comparison? Ceruledge does get access to Iron Head as well as Clear Smog (though that won't be good for people using Acid Spray), but what if he's Will O Wisped after his ability is neutralized? It'll rarely happen, but there's a difference between rarely and never.
Armarouge @ Shell Bell
Ability: Flash Fire
Tera Type: Steel
EVs: 20 SpA / 252 SpD / 236 Spe
Timid Nature
IVs: 0 Atk
- Acid Spray
- Calm Mind
- Mystical Fire
- Flash Cannon
The spread I’m using. I feel the Speed is key in getting those Mystical Fires off before Delphox can attack. I kinda wanna do max SpA instead of SpD but I’ll need to get more Grepa berries lmao

Quickly raised up an Armarouge for this and yeah caught it first try and the only one who was close to (but didn't actually!) dying was a typhlosion someone brought along.
I was with another Armarouge and a Heatran as well. Armarouge saw I was using Mystical Fire, so they focused on Acid Spray, then when he shifted to some other support stuff (attempts to block dazzling gleam with wide guard and light screen) I threw in a few Acid Sprays as well.
put it in a Fast Ball
Also I'm poor again, I need to go on the raid circuits again.

Ceruledge also works as an alternative to Armarouge.
Part 0: Motivation
Now that HOME compatibility has been out for a month, I feel like something that has been taken for granted with the popular builds for this raid is accessibility. If someone is looking for a solo Pokemon available in both Scarlet and Violet that spawns naturally with its base tera type, without a mutually exclusive starter choice or trading or transfers from other games, then there really aren't many solo options out there in discussions. The main talk is either with HOME transfers or version exclusive mons. This is why I wanted to win with a mon of the people, for everyone out there who can't play online with anyone or get any version exclusives.
This post is still actually about another Azumarill solo again, but this was not as easy as expected. Before it dropped, I thought this would be an easy clear to show who the better Fairy was. However, gamefreak actually put the pressure a lot higher with the shortened time, double moves, and multiple problem points. I ended up having a good feel of when I could set up as a result, so this post will cover my general intuition and practical notes of my winning attempt. My Azumarill set is the same as it's been for other raids, featuring the Shell Bell and Amnesia/Play Rough/Belly Drum/Mud-Slap to deal with just about everything a special attacker does, but the timing was still tight and there was a lot to figure out in between.
Part 1: The Beginning


In the blind runs of this raid, I started off floundering and running out the timer. Seeing Will-O-Wisp in the main moveset and Fire Blast for the first time was unexpected, and an early shield plus the Nasty Plot midway through the timer was disheartening. After some initial failures dealing with burns, Facade was proposed in the smogon raids channel and I thought that my Normal tera Azumarill that I used in my playthrough could take the most advantage of it. In the end this was not how I won the run since I realized that I could just avoid being burned for the majority of the raid and being burnt was actually a major issue both damage and time-wise, but I learned a lot of lessons through spamming those attempts that I used in my winning run and I will go over those experiences.
Part 2: The Failed Attempts


My moveset was mainly staying the same, but I was getting a better sense of when to set up with my buffs and debuffs though not to much success. One main lesson I learned at this point was that I was spamming Mud-Slap so much and using heal cheers so that I wasn't actually ending up burned when I was ready to start trying to go for the kill and missing out on enough damage. There just wasn't an opportune time to get burnt as I had to hit a lot of Mud-Slaps that I didn't want to be burned for but I also couldn't really get burnt after setting up Mud-Slap, so I ended up trying to win without getting burnt which I just didn't have enough damage to finish with. At some point I realized that I could just go back to tera STAB Fairy moves if I wasn't getting burned anymore, but I still kept trying Facade strategies for a while, and I did end up making another significant investment that won me the raid.

(My closest failed attempt with Tera-Normal Facade.)
Part 2.5: Rigging the Game


Partway through Part 2 but before I switched back to Fairy, I realized that AI Bellibolt was the factor that was making or breaking these attempts. Speed control with Mud Shot and Discharge being the only possible source of paralysis through the shield was a game changer, allowing me to set up before Delphox got to move and prevent Delphox from moving entirely. Potentially interrupting Nasty Plot and Magic Room and double attacks were also appreciated bonuses.
What I ended up doing was saving at a 3 Star Steel Haunter raid and using the "join a group" option, which locks in all the AI choices for future raids. I would reset if the AI did not roll Bellibolt, since you can't run from raids started as a group. I wanted to avoid Umbreon and Gardevoir due to Synchronize passing on burn, as well as Arboliva for grassy terrain using up precious time. I thought Sylveon's Moonblast SpA drops could have also helped mitigate Delphox's damage output, but Amnesia handles that for most of the raid and once Delphox gets below 60% HP to reset your buffs, you're basically in the endgame anyway and have to bank on dodging.
This process took some time, but it was mostly idle and I felt it was better invested to get Bellibolt consistently instead of running on completely random AI and hoping to get Bellibolt. I also got Heracross who was not particularly noteworthy and Arcanine who had a 10% chance to burn but also could put some Leers up, though it probably didn't really matter much in practice.
Part 3: The Strategy
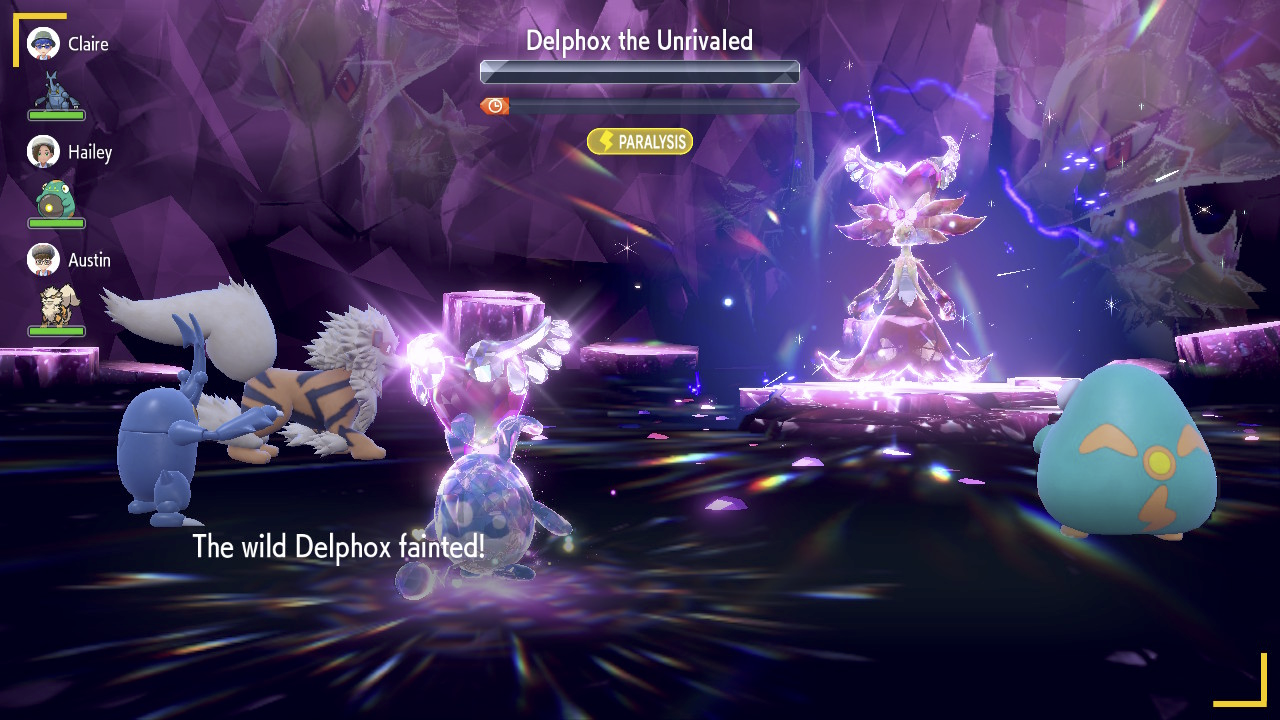
At this point I had fought Delphox many times and had strong feelings on when to do what. My general gameplan was to start off with Amnesia, then one Mud-Slap just to get it below 100% accuracy, then finish setting up my SpD with 2 more Amnesias. Around then I would heal after the shield went up and try to sneak a Belly Drum in early, which could end up taking another heal cheer to replenish. Afterwards Delphox gets to the point where it resets its debuffs, and that's when I have to set up as many Mud-Slaps as I can ideally before it gets to Nasty Plot, and also after a tera charge steal though I usually don't have all 6 up by then. When I feel safe enough, this is when I have to start going on the offense and activate the tera STAB Play Rough. Ideally a Water Azumarill would be better to resist Fire Blast and have 100% accurate Liquidation STAB, but this is just the Azumarill I've been rolling with since Charizard. It takes a few hits to chip through the shield and Delphox will end up resetting buffs + Magic Rooming + double attacking around after it goes down. I had attempts where I tried to re-setup Amnesias with Facade since I wasn't doing enough damage, but there was usually not enough time to finish the job. The main strategy I had at this point was to just reset Belly Drum immediately and hope Delphox doesn't land any hits on me and just try to win from there.
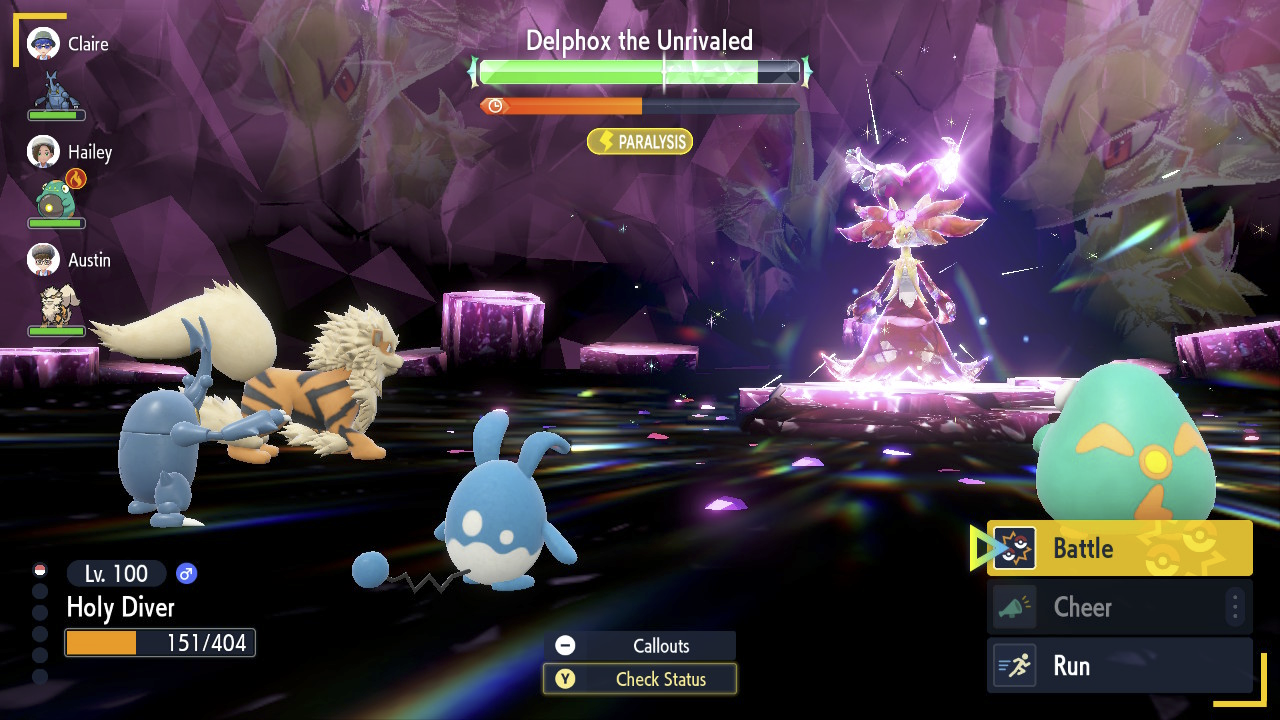
Part 4: The Final Cut
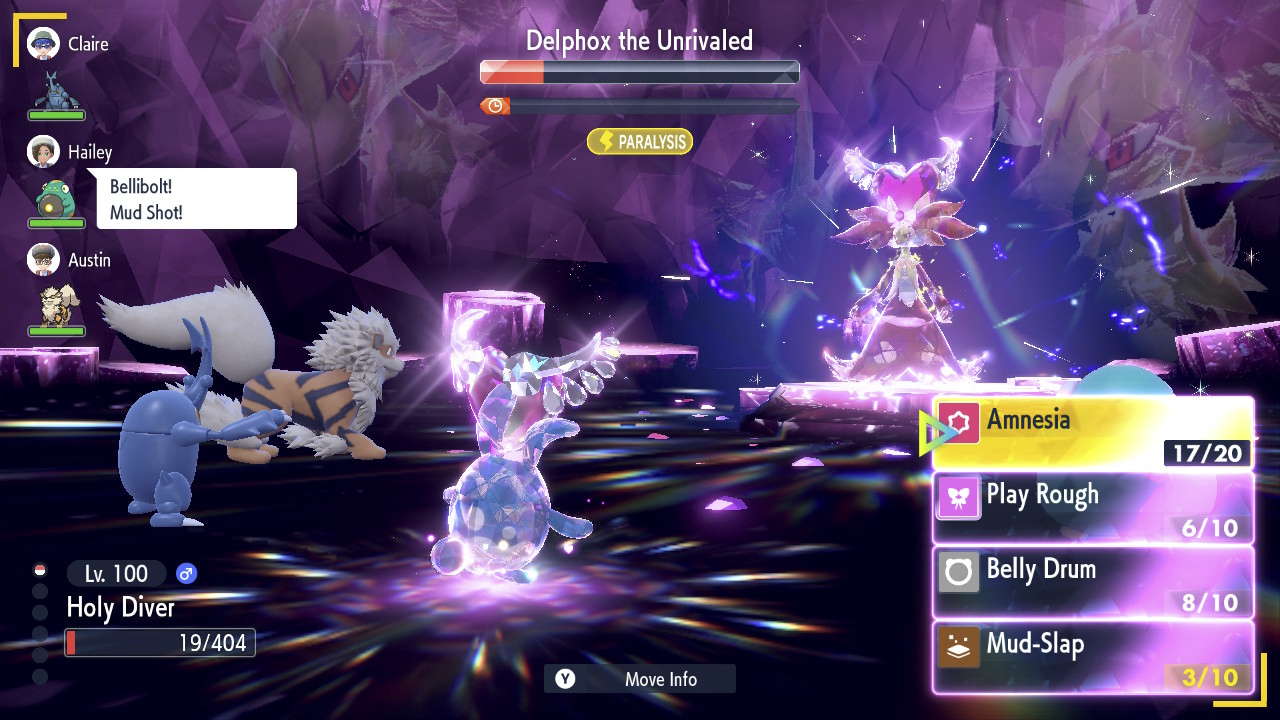
In my first run back with the Fairy Azumarill again, I ended up taking 2 heal cheers after the shield went up to be safe. After the Belly Drum I got burnt, but Delphox had just reset its stats so I went for Mud-Slaps instead. I ended up cutting it very close at this point going into red HP from Psychic and fortunately rolled high on my heal cheer to 172 HP, while Bellibolt finally landed paralysis and I blocked Nasty Plot from going off. At this point I felt safe about going for all 6 Mud-Slaps to completely neutralize Delphox, though it did land one Psychic at -5 accuracy which was acceptable. As long as there was no burn, there was still a chance.
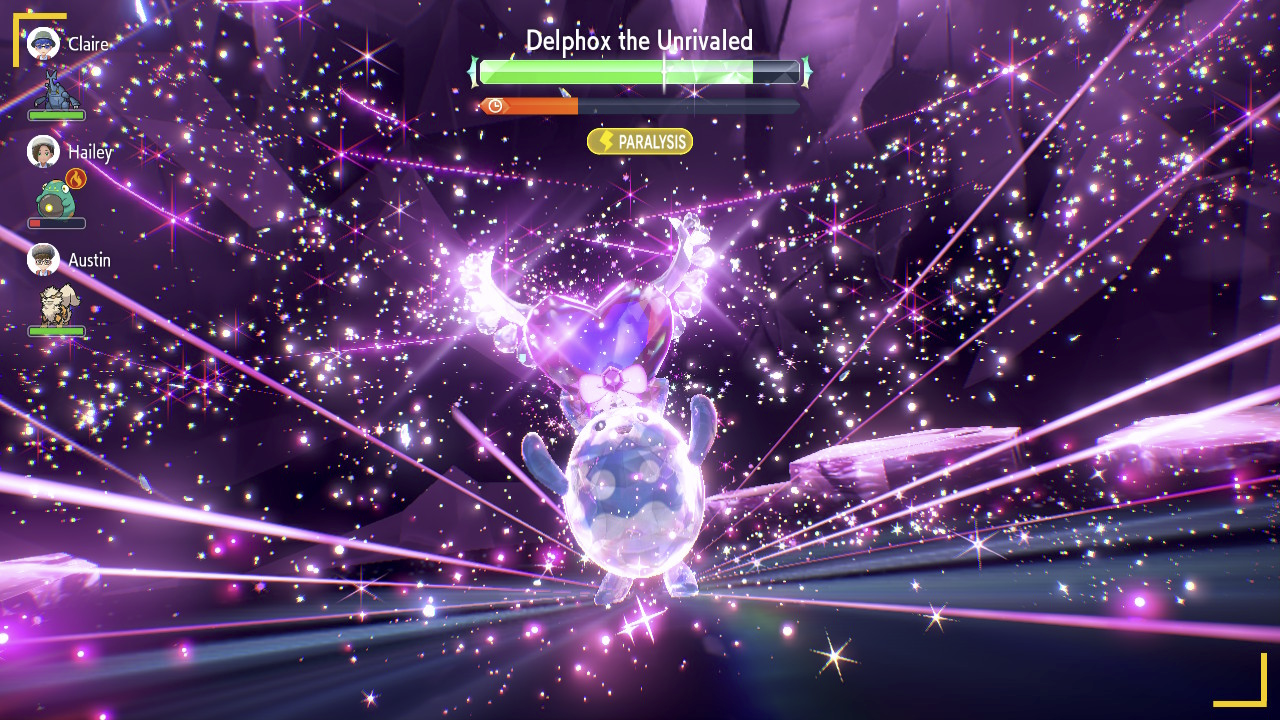
(left: before Mud-Slaps, right: after Mud-Slaps and terastallizing)
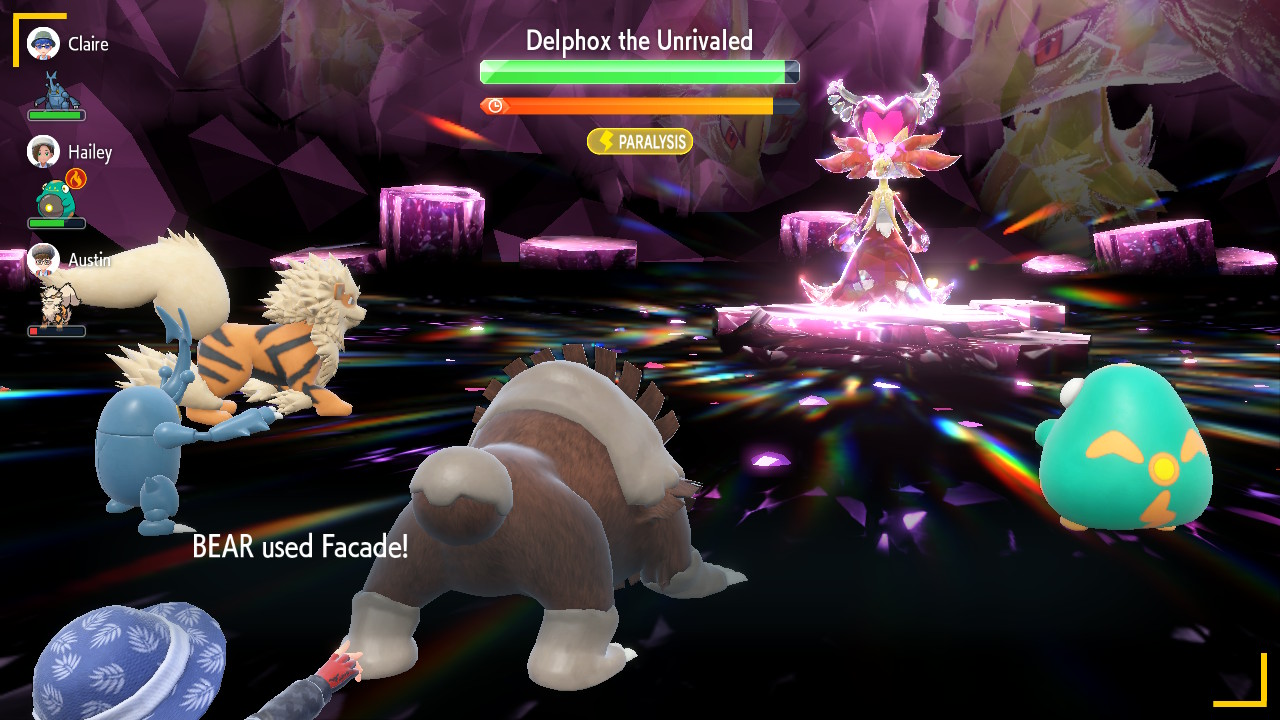
It took some time, but after all was said and done, there was nothing else to do but finally start to tera on the offensive and see if this run would pan out. The tera STAB Play Rough took about 3 hits to break the shield. After breaking through the shield, Magic Room did get through the paralysis, but I immediately took advantage of Delphox missing a turn after the shield break to reset Belly Drum again, which was right when a tremendous energy started gathering again.
Play Rough did half of Delphox's remaining health, more than I'd ever seen Facade do. I'm not sure what Delphox did end up landing a last ditch Fire Blast through paralysis and -6 accuracy that almost took me out in my half-health state from the second Belly Drum usage, but Azumarill held on and just had to land one more Play Rough to deal the final blow, and so it did.
Part 5: Conclusion
Overall I think gamefreak did a pretty good job with this one despite my struggles with it. The moveset was not packing any of the expected coverage, but was still a pretty tough challenge for solos, and the lower timer really puts a crunch on classic setup strategies this time around. Azumarill only managed to win this one because of hax preventing Delphox from doing anything, and even then it was down to the wire.
Now that HOME compatibility has been out for a month, I feel like something that has been taken for granted with the popular builds for this raid is accessibility. If someone is looking for a solo Pokemon available in both Scarlet and Violet that spawns naturally with its base tera type, without a mutually exclusive starter choice or trading or transfers from other games, then there really aren't many solo options out there in discussions. The main talk is either with HOME transfers or version exclusive mons. This is why I wanted to win with a mon of the people, for everyone out there who can't play online with anyone or get any version exclusives.
This post is still actually about another Azumarill solo again, but this was not as easy as expected. Before it dropped, I thought this would be an easy clear to show who the better Fairy was. However, gamefreak actually put the pressure a lot higher with the shortened time, double moves, and multiple problem points. I ended up having a good feel of when I could set up as a result, so this post will cover my general intuition and practical notes of my winning attempt. My Azumarill set is the same as it's been for other raids, featuring the Shell Bell and Amnesia/Play Rough/Belly Drum/Mud-Slap to deal with just about everything a special attacker does, but the timing was still tight and there was a lot to figure out in between.
Part 1: The Beginning
In the blind runs of this raid, I started off floundering and running out the timer. Seeing Will-O-Wisp in the main moveset and Fire Blast for the first time was unexpected, and an early shield plus the Nasty Plot midway through the timer was disheartening. After some initial failures dealing with burns, Facade was proposed in the smogon raids channel and I thought that my Normal tera Azumarill that I used in my playthrough could take the most advantage of it. In the end this was not how I won the run since I realized that I could just avoid being burned for the majority of the raid and being burnt was actually a major issue both damage and time-wise, but I learned a lot of lessons through spamming those attempts that I used in my winning run and I will go over those experiences.
Part 2: The Failed Attempts
My moveset was mainly staying the same, but I was getting a better sense of when to set up with my buffs and debuffs though not to much success. One main lesson I learned at this point was that I was spamming Mud-Slap so much and using heal cheers so that I wasn't actually ending up burned when I was ready to start trying to go for the kill and missing out on enough damage. There just wasn't an opportune time to get burnt as I had to hit a lot of Mud-Slaps that I didn't want to be burned for but I also couldn't really get burnt after setting up Mud-Slap, so I ended up trying to win without getting burnt which I just didn't have enough damage to finish with. At some point I realized that I could just go back to tera STAB Fairy moves if I wasn't getting burned anymore, but I still kept trying Facade strategies for a while, and I did end up making another significant investment that won me the raid.
(My closest failed attempt with Tera-Normal Facade.)
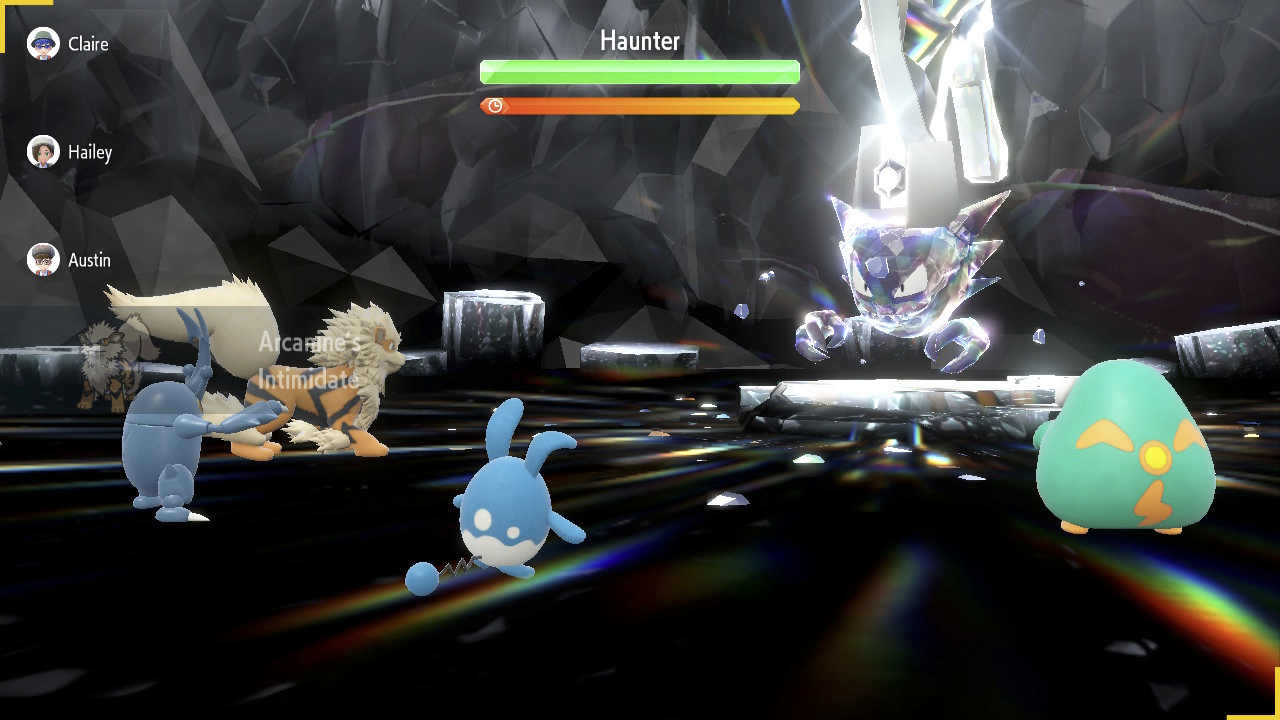
Part 2.5: Rigging the Game
Partway through Part 2 but before I switched back to Fairy, I realized that AI Bellibolt was the factor that was making or breaking these attempts. Speed control with Mud Shot and Discharge being the only possible source of paralysis through the shield was a game changer, allowing me to set up before Delphox got to move and prevent Delphox from moving entirely. Potentially interrupting Nasty Plot and Magic Room and double attacks were also appreciated bonuses.
What I ended up doing was saving at a 3 Star Steel Haunter raid and using the "join a group" option, which locks in all the AI choices for future raids. I would reset if the AI did not roll Bellibolt, since you can't run from raids started as a group. I wanted to avoid Umbreon and Gardevoir due to Synchronize passing on burn, as well as Arboliva for grassy terrain using up precious time. I thought Sylveon's Moonblast SpA drops could have also helped mitigate Delphox's damage output, but Amnesia handles that for most of the raid and once Delphox gets below 60% HP to reset your buffs, you're basically in the endgame anyway and have to bank on dodging.
This process took some time, but it was mostly idle and I felt it was better invested to get Bellibolt consistently instead of running on completely random AI and hoping to get Bellibolt. I also got Heracross who was not particularly noteworthy and Arcanine who had a 10% chance to burn but also could put some Leers up, though it probably didn't really matter much in practice.
Part 3: The Strategy
At this point I had fought Delphox many times and had strong feelings on when to do what. My general gameplan was to start off with Amnesia, then one Mud-Slap just to get it below 100% accuracy, then finish setting up my SpD with 2 more Amnesias. Around then I would heal after the shield went up and try to sneak a Belly Drum in early, which could end up taking another heal cheer to replenish. Afterwards Delphox gets to the point where it resets its debuffs, and that's when I have to set up as many Mud-Slaps as I can ideally before it gets to Nasty Plot, and also after a tera charge steal though I usually don't have all 6 up by then. When I feel safe enough, this is when I have to start going on the offense and activate the tera STAB Play Rough. Ideally a Water Azumarill would be better to resist Fire Blast and have 100% accurate Liquidation STAB, but this is just the Azumarill I've been rolling with since Charizard. It takes a few hits to chip through the shield and Delphox will end up resetting buffs + Magic Rooming + double attacking around after it goes down. I had attempts where I tried to re-setup Amnesias with Facade since I wasn't doing enough damage, but there was usually not enough time to finish the job. The main strategy I had at this point was to just reset Belly Drum immediately and hope Delphox doesn't land any hits on me and just try to win from there.
Part 4: The Final Cut
In my first run back with the Fairy Azumarill again, I ended up taking 2 heal cheers after the shield went up to be safe. After the Belly Drum I got burnt, but Delphox had just reset its stats so I went for Mud-Slaps instead. I ended up cutting it very close at this point going into red HP from Psychic and fortunately rolled high on my heal cheer to 172 HP, while Bellibolt finally landed paralysis and I blocked Nasty Plot from going off. At this point I felt safe about going for all 6 Mud-Slaps to completely neutralize Delphox, though it did land one Psychic at -5 accuracy which was acceptable. As long as there was no burn, there was still a chance.
(left: before Mud-Slaps, right: after Mud-Slaps and terastallizing)
It took some time, but after all was said and done, there was nothing else to do but finally start to tera on the offensive and see if this run would pan out. The tera STAB Play Rough took about 3 hits to break the shield. After breaking through the shield, Magic Room did get through the paralysis, but I immediately took advantage of Delphox missing a turn after the shield break to reset Belly Drum again, which was right when a tremendous energy started gathering again.
Play Rough did half of Delphox's remaining health, more than I'd ever seen Facade do. I'm not sure what Delphox did end up landing a last ditch Fire Blast through paralysis and -6 accuracy that almost took me out in my half-health state from the second Belly Drum usage, but Azumarill held on and just had to land one more Play Rough to deal the final blow, and so it did.
Part 5: Conclusion
Overall I think gamefreak did a pretty good job with this one despite my struggles with it. The moveset was not packing any of the expected coverage, but was still a pretty tough challenge for solos, and the lower timer really puts a crunch on classic setup strategies this time around. Azumarill only managed to win this one because of hax preventing Delphox from doing anything, and even then it was down to the wire.
I picture Ceruledge having some trouble due to not only being severely crippled from WOW after the buff reset, but also needing Tera Steel to take no more than NVE damage unlike Armarouge who is resistant to all 3 off the bat with one of them being an immunity with Flash Fire. And with the move Ceruledge is most vulnerable to being Psychic, which has a chance of dropping Spec Def, yeah. Not helped by Ceruledge lacking Mystical Fire. Nevertheless, I suppose Ceruledge could accomplish something with this.

Shell Bell
Flash Fire
Tera Steel
252 Sp Def / 252 Atk / 6 HP
Adamant nature
Bitter Blade
Iron Head
Clear Smog
Swords Dance
Shell Bell
Flash Fire
Tera Steel
252 Sp Def / 252 Atk / 6 HP
Adamant nature
Bitter Blade
Iron Head
Clear Smog
Swords Dance
I think we should ban youtubers from ever recommending raid movesets with clear smog in their videos. There are too many people out there that just don't know when you want to use clear smog, and when you very much do not want to use clear smog. It's not my raid partner's fault; I don't expect people doing a fun little co-op mode to know what this weirdo wimpy damage move does. It's just we shouldn't have incomplete information on it flowing so freely. It's dangerous. It's like letting there be ads to buy male-to-male extension cords, or contracting OceanGate to make school buses. It's going to lead to unneeded pain and suffering.
Why Ceruledge? WHY did you clear smog the -2 SpAtk -4 SpDef Delphox? We were doing so well and you blew it.
Why Ceruledge? WHY did you clear smog the -2 SpAtk -4 SpDef Delphox? We were doing so well and you blew it.
I've got a handful quick kills earlier, with mostly anyone just locking one of Ceruledge, Armarouge, Heatran or Blissey.
I can't wait to try it later tonight just for another list of weird atrocities people will bring. I'll be disappointed if I don't see at least one Sneaseler and one Scizor.
I can't wait to try it later tonight just for another list of weird atrocities people will bring. I'll be disappointed if I don't see at least one Sneaseler and one Scizor.
Honestly the worst thing is the people bringing in Koraidons that get one shot by the opening move AND boost its Fire Attacks lol. Too many people on day 1 doing that...I've got a handful quick kills earlier, with mostly anyone just locking one of Ceruledge, Armarouge, Heatran or Blissey.
I can't wait to try it later tonight just for another list of weird atrocities people will bring. I'll be disappointed if I don't see at least one Sneaseler and one Scizor.
Anyways, for anyone that uses Arceus: be aware that Magic Room seems to turn Judgment into a Normal move! I didn't even think of that interaction, but it was very annoying as someone who was seeing if SpD Poison Arceus could do the raid. Spoiler: yes it can, but Magic Room sorta removes its advantages lol. Might as well use Fire or Water Arceus at that point, who basically is an alternate Armarouge: it Snarls and Acid Sprays. Snarl is less reliable and doesn't do as much damage, but Arceus is way bulkier even if it doesn't resist everything and can Recover. Honestly, not really worth using over Armarouge, but if you're gonna use Arceus, going with that is probably the best!
I also did try the full support Mew: issue with it is this raid's faster timer means Mew just fully supporting often wasn't enough, so this Mew doesn't work as a "I need to keep my dumb teammates alive" machine with Snarl + Life Dew like that Chilling Water + Life Dew Mewtwo does in a lot of physical raids. It does work fine on a competent looking team though!
I did this raid a few times using the Armarouge I had ready in my box, just taught her a few TMs. I must say I'm surprised that no one else seems to bring Armarouge, it's all Ceruledge and a couple of Heatran. It's fun playing Armarouge, you have to juggle stat drops and offence a lot. That said I often find myself on the support duty, spamming Mystical Fire usually... Making sure that some random Dialga doesn't die. Caught my Delphox in a Dream Ball, I had a few from auctions
One interesting mon I saw was Bronzong, actually. It was clearly just a random Bronzong the dude had in his boxes, but it had Heatproof, it seems, applied rain dance and didn't die once. It seems like if you would train it for real it'd be just bad Heatran in this case, but here's what I came up with:
Bronzong @ Leftovers / Sitrus Berry
Ability: Heatproof
Tera Type: Steel
EVs: 252 HP / 4 SpA / 252 SpD
Modest Nature
IVs: 0 Atk
- Flash Cannon
- Calm Mind
- Light Screen
- Metal Sound
...I'm not sure Bronzong needs all that SpDef, but I think if you go full SpAtk you might get hurt a bit much. And 252/252 builds is the extent my mind can produce, unfortunately. There's also Rain Dance you could put somewhere. Could be entertaining, I think, and is sure to scare away most randoms.
Just got into a lobby with another Armarouge, great!..... Then it used Ember and Fire Spin, and proceeded to die twice pretty quickly. 
Fortunately my Armarouge and other teammates Heatran and Bellibolt were able to take Delphox down with about 1/3rd of the timer left. Mystical Fire really helps keep everyone alive, especially after the Nasty Plot.
Second lobby, someone locks in with Protean Greninja, hits with Gunk Shot, and proceeds to get one-shot by Psychic.
I dunno what passes for “good” but I solo’d it with a pretty typical Armarouge setAnyone conocted a good soloing set yet?
It's pretty free online but I have some friends who don't have NSO so kinda have to do it alone. Magic Room coming at same time of buff reset makes me think this may require a bit more elaborate setup.
Armarouge @ Shell Bell
Nature: Modest
Ability: Flash Fire
Tera Type: Steel
EVs: 252 SpA, 252 SpD, I don’t remember what the other 4 were in
IVs: Hyper Trained all except Attack
Moveset:
- Acid Spray
- Mystical Fire
- Calm Mind
- Flash Cannon
And overall I felt like it was pretty easy? I hit it with 3 Acid Sprays, then it stole a charge from my Tera Orb. I used Mystical Fire to get a drop on its SpAtk, then it put the shield up. Hit it with Tera boosted Flash Cannons, and the shield was gone in 3-4 turns. It was KO’d three turns after that with plenty of timer left. None of its attacks were really putting much of a dent in me, not even after the debuff clear.
I decided to try a quick-kill solo setup with Ursaluna's Facade.

+6 252+ Atk Normal Gem Guts Ursaluna Atk Cheer Facade (140 BP) vs. -2 0 HP / 0 Def Tera Fairy Delphox: 8109-9541 (92.8 - 109.2% of 30x hp boss) -- 56.3% chance to OHKO
The time pressure is tough as you only really have time for 3 turns before the shield goes up to input Attack Cheer, Belly Drum, and Facade, but this means the attempts go by fairly quickly. To get in OHKO range I also need Arcanine to Leer twice or land a crit. A heal cheer would be nice for safety but is just slightly too slow to fit in.
I still used the same AI partners as last time. Arcanine's Leer is the crux of the strategy, despite adding time with Intimidate and resisting Dazzling Gleam. Heracross being weak to Dazzling Gleam adds an additional textbox early on that might let me get a 4th move in, but I didn't want to reroll. Bellibolt also adds potential paralysis and ended up allowing me to land Facade before Delphox made its move.
(EDIT: Heracross being in slot 1 also means that it is designated to use the AI defense cheer turn 1 which is nice so the other AI can get their moves off.)
Delphox only really goes for Fire Blast and Will-O-Wisp against Ursaluna, which is crucial since both have 85% accuracy. Ideally I would prefer these to miss until I get Will-O-Wisped before the final blow, because an early burn takes too much time, but a turn 1 miss on either move is mandatory (15% chance). If Fire Blast lands Turn 1 I cannot Belly Drum, and I do not live Wisp + Fire Blast even after the AI's defense cheer, but I can take a Fire Blast on turn 2 without burn damage, so there are a few routes to victory here but it's still generally not too reliable.
Last edited:
I used the Armarogue set in this video, which definitely worked, though I found it to be less consistent than the demonstration shown, so it might depend on AI partners and any variability in when Delphox steals your tera charge. (e.g., reset if you roll Arbolivia, who will overwrite your psychic terrain)Anyone conocted a good soloing set yet?
It's pretty free online but I have some friends who don't have NSO so kinda have to do it alone. Magic Room coming at same time of buff reset makes me think this may require a bit more elaborate setup.
Lee also put out a video claiming a steel Arceus set is even better, but I haven't watched the vid:


Armarouge is amazing— I have no heatran as I got no way to connect to my Gen 4 Squad—though not able to carry as Espathra v Chestnaught. Your partners have to be somewhat competent. Still I think Delphox was a reasonable and satisfying raid.
I wish they gave my boy Flareon a bit more; just a bit more and it would be awesome this raid, just no real advantage over Armor and Cereledge
I wish they gave my boy Flareon a bit more; just a bit more and it would be awesome this raid, just no real advantage over Armor and Cereledge
My issue with Heatran is how reliant it is on Armarouge's Acid Spray to function. It has Metal Sound, but it can miss and it won't go through shield, which is bad once the boss status clear turn happens. No boosting moves for itself, either, to at least offset that before shield goes down. The only other utility move it has is Taunt, but it only really stops Wisp spam which isn't that useful on a whole party of Flash Fire mons. Meanwhile, Armarouge has Acid Spray, Light Screen, Calm Mind, and Mystical Fire to not only support its team but also dish out much higher damage than Heatran could dream to output.
Don't use Heatran. It's subpar here.
Don't use Heatran. It's subpar here.
Eh, I'd rather say "use Heatran if there's already one or more Armarouge or Ceruledge".
Multiple Armarouges won't exactly stack their effects anyway, and at that point may as well bring actual damage to the table. Plus AV Heatran (what I have used) is so insanely bulky it doesn't require any healing and you can just click def cheer > offense cheer > pew pew while the armor mons and blissey do their things.
Multiple Armarouges won't exactly stack their effects anyway, and at that point may as well bring actual damage to the table. Plus AV Heatran (what I have used) is so insanely bulky it doesn't require any healing and you can just click def cheer > offense cheer > pew pew while the armor mons and blissey do their things.